- Claims
- Eligibility
- Forms
- Online Reviews
- Patient Messaging
- Payments
- Secure Email
We have multiple ways to automatically send claims. Make sure you have the latest version of Vyne’s PMS Dental Plugin from our Downloads Page, then follow these steps.
If you still need to submit claims manually, keep reading.
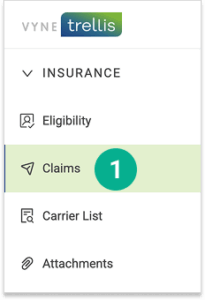
Step 1
Open Vyne Trellis and Click on "Claims" in the Left Sidebar
Step 2
Turn on Manual Claim Entry in your Settings
1. On your Claims Management page, select the ellipsis icon (...) on the far right
2. Select Settings
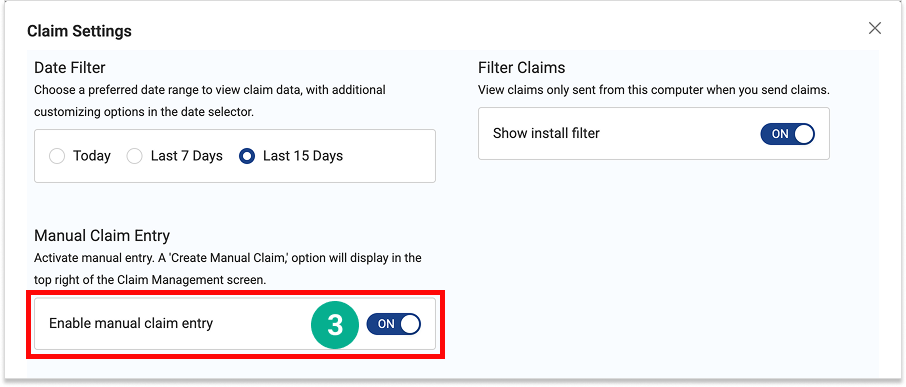
3. Toggle the “Enable Manual Claims” switch to “On”
Step 3
Create and Send a Manual Claim
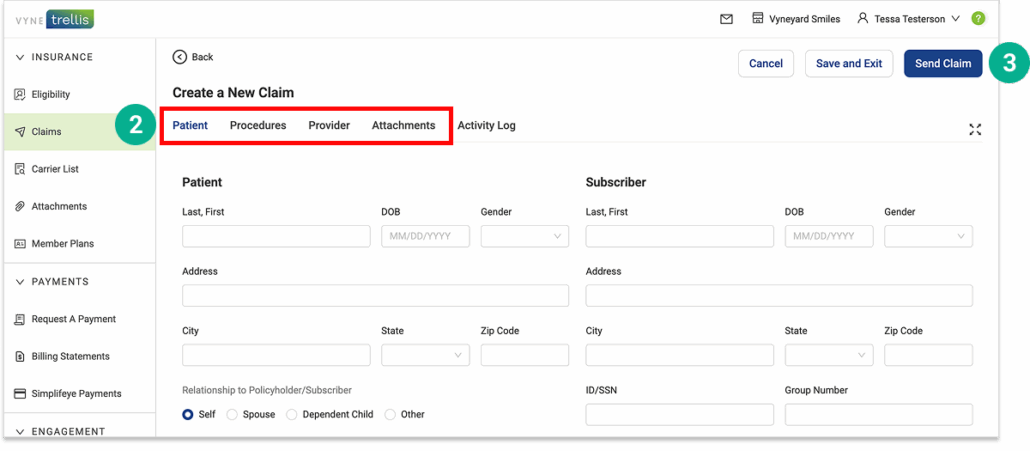
1. Select the “Create Manual Claim” button
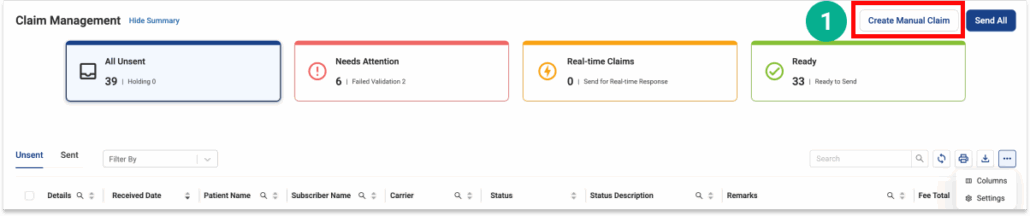
2. Complete all necessary Claim information
3. Click "Save and Exit" to send later or "Send Claim" to send immediately
How to Manually Verify Eligibility & Benefits
1. Select Eligibility tab
2. Select Add Patient

3. Enter the required information
4. Select Verify
Note: After the patient has been added you may select the patient to run future eligibility.

Step 1
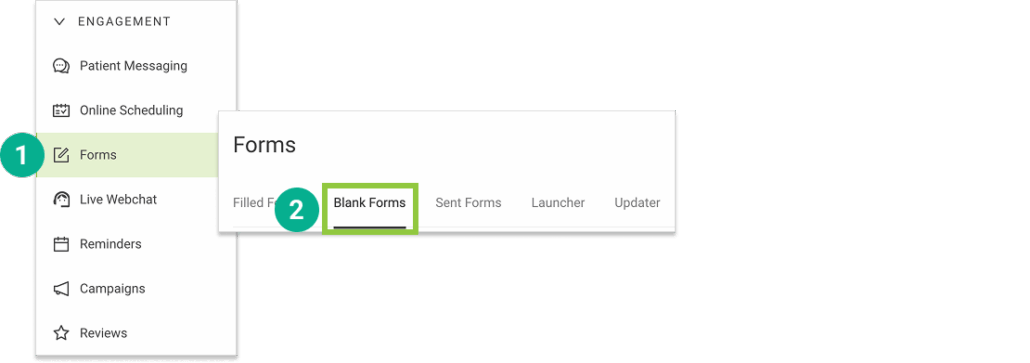
Access Forms
1. Open Trellis and expand the Engagement Section. Click on Forms in the sidebar.
2. Select the “Blank Forms” tab
Step 2
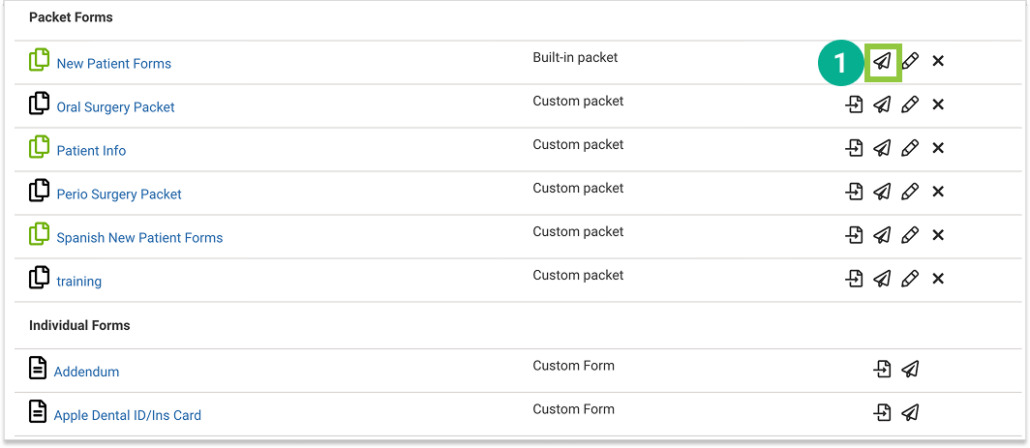
Select the form(s) you'd like to send
1. Identify the form packet or individual form you’d like to send and select the Send icon (paper airplane).
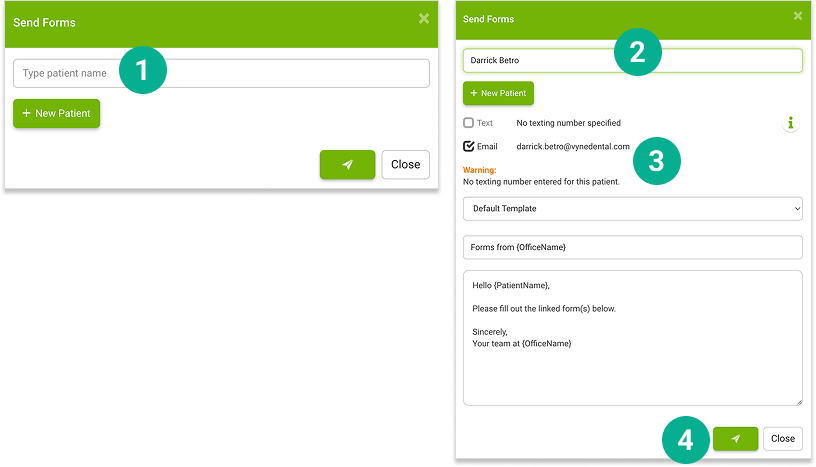
If the patient you'd like to send a form to already exists in Trellis:
1. Enter their name in the “Type patient name” field, select the patient, and complete the form to send.
2. Complete all the patient information
3. Select the format (Text or Email) and template for your communication
4. Click the Send icon
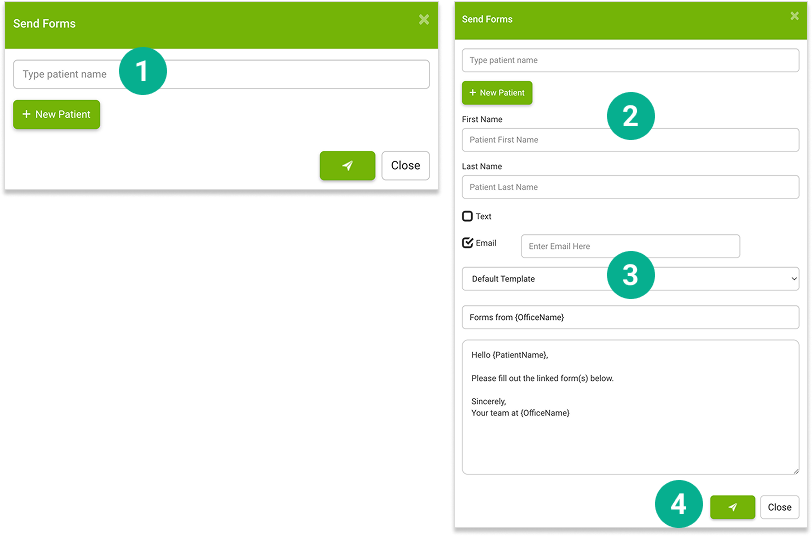
If this is a NEW patient or they do not yet exist in Trellis:
1. Select the “+ New Patient” button
2. Complete all the patient information
3. Select the format (Text or Email) and template for your communication
4. Click the Send icon
Step 3
Customize Your Forms Experience
Easily add forms to your practice website, create new forms, and set up an in-office tablet experience. Integrate your Topaz and ePad signature pads for a streamlined form signature experience.
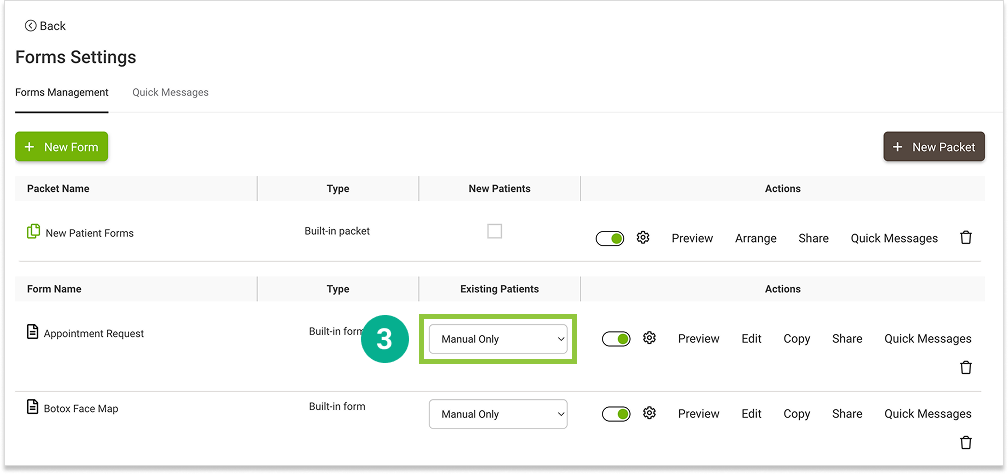
Forms Settings
1. Open Trellis and expand the Engagement Section. Click on Forms in the sidebar.
2. Select the Settings “gear” icon in the upper right.
3. Click the drop down menu in the Existing Patients column.
Individual forms are available for Existing Patients and included in the following message types.
- Save-the-date
- Appointment Reminders
- Appointment Confirmations
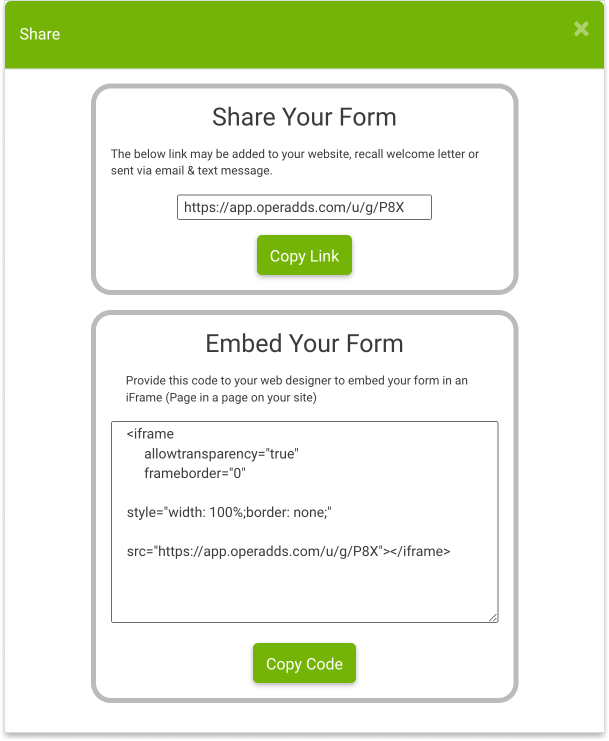
4. Add Forms to your website by sharing the link with your web designer, available by way of the Share option
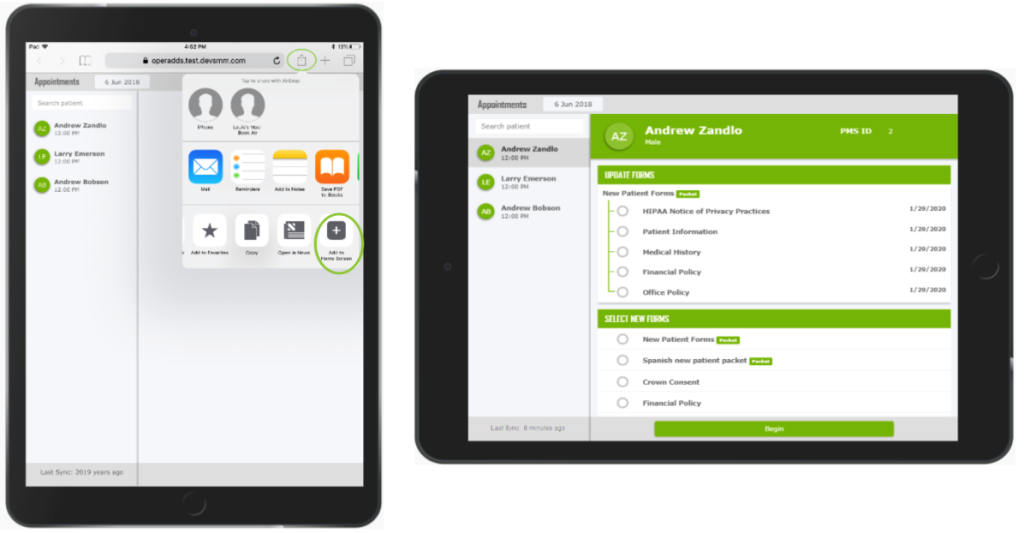
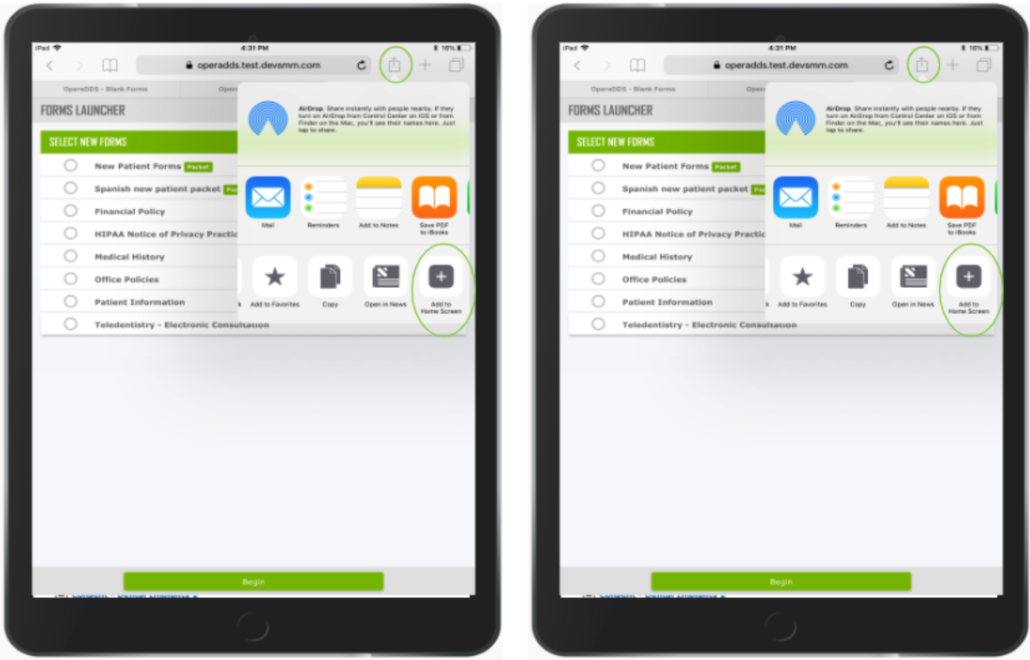
5. Add Forms to your your tablet
- Login to Vyne Trellis on your tablet via Google Chrome
- Click on the Forms feature
- For reception, select the Updater
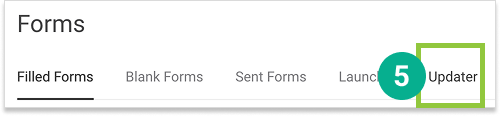
Use the upward arrow option to Add to Home Screen
For clinical, select the Launcher
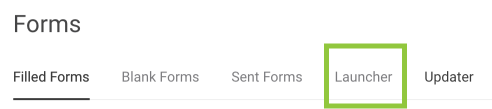
Use the upward arrow option to Add to Home Screen
6. Create New Forms
- Click on the Forms feature
- b. Click on the Settings wheel in the sidebar | Feature Settings | Forms Settings
- c. Select New Form
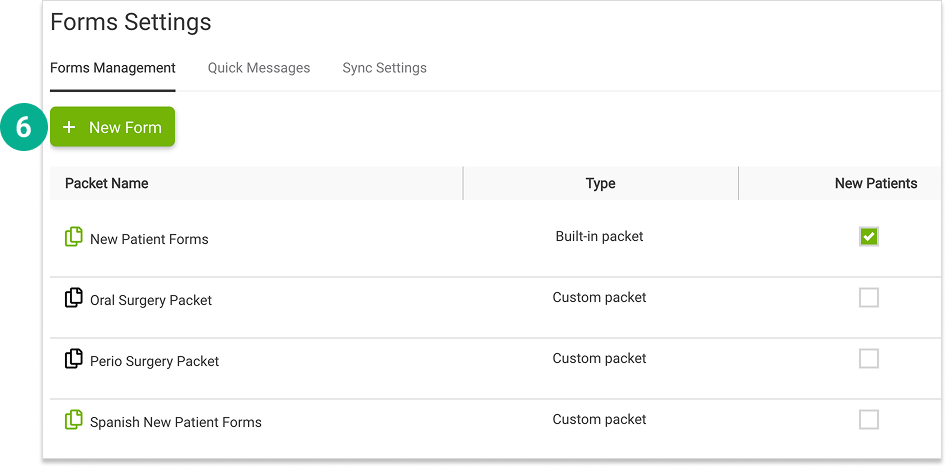
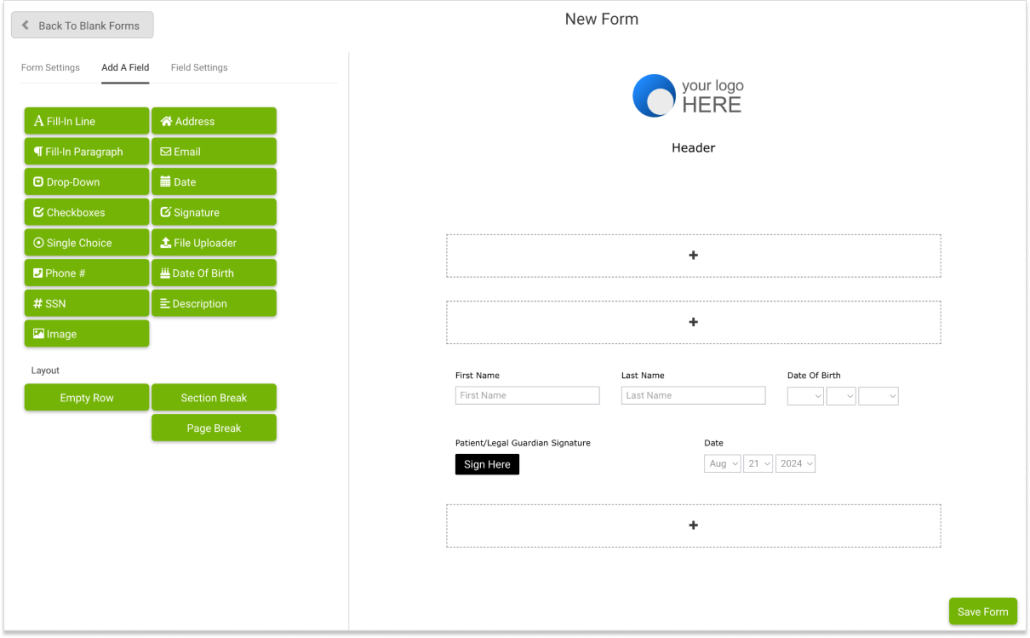
Use the Drag-and-Drop Custom Form Builder to create your very own custom Forms.
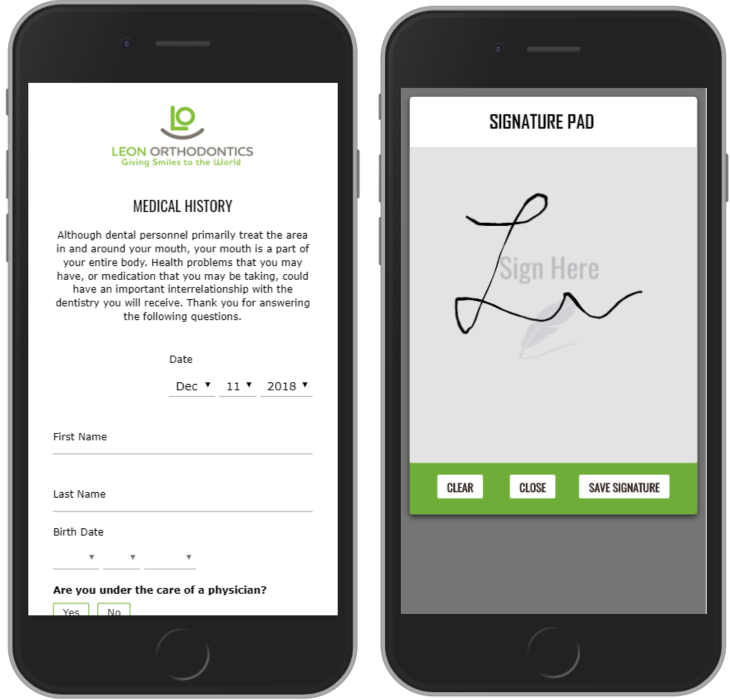
8. Signing Forms can be done via patient personal device, tablet, or computer.
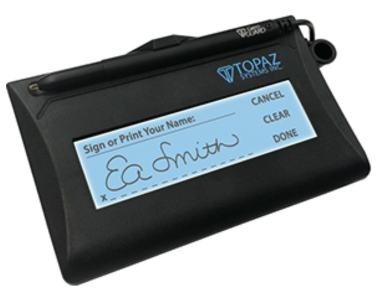
Topaz Signature device
1. Use the Topaz Signature pad instructions found here
2. Next, refer to the instructions here
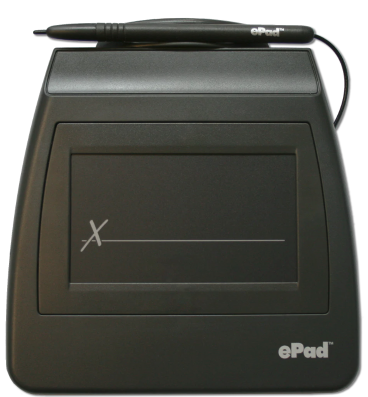
ePad Signature
1. Use the ePad Signature instructions found here
2. Next, refer to the instructions here
Step 1
Set up your social media and notifications
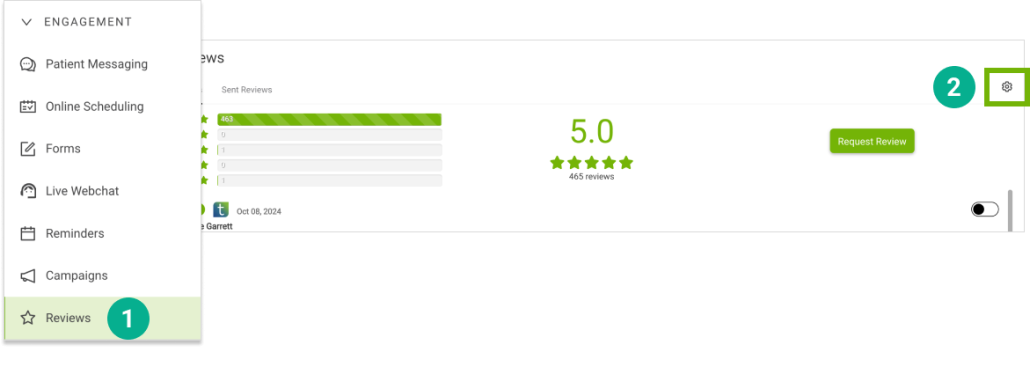
1. Open Trellis and expand the Engagement Section. Click on Reviews in the sidebar
2. Select the Settings “gear” icon in the upper right
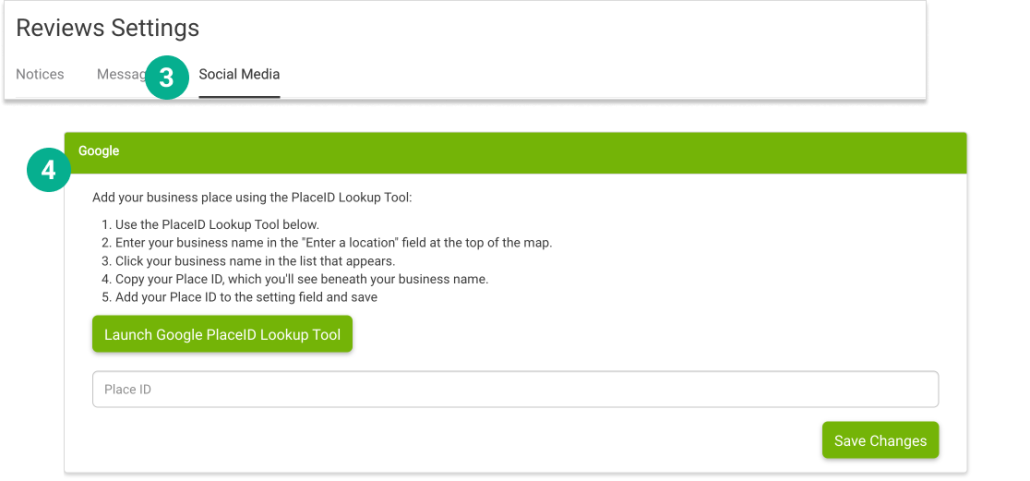
Set your Google place ID
3. Select the Social Media tab and scroll down to the Google section (4) and add your business place using the PlaceID Lookup Tool
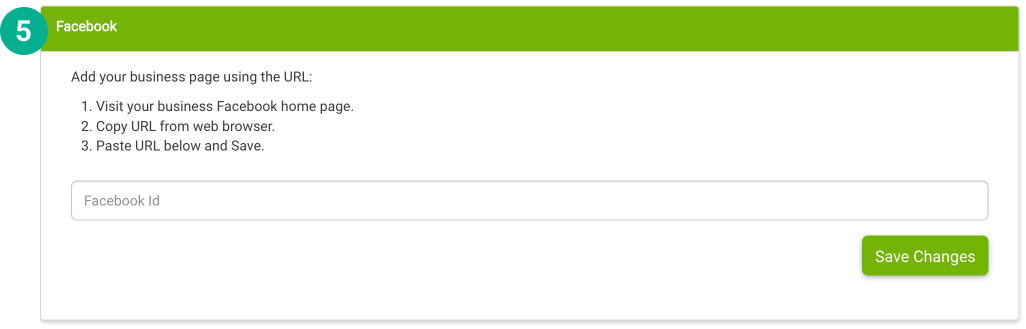
Set your Facebook URL
5. Scroll down to the Facebook section and add your business page using the URL
Step 2
Add a New Patient
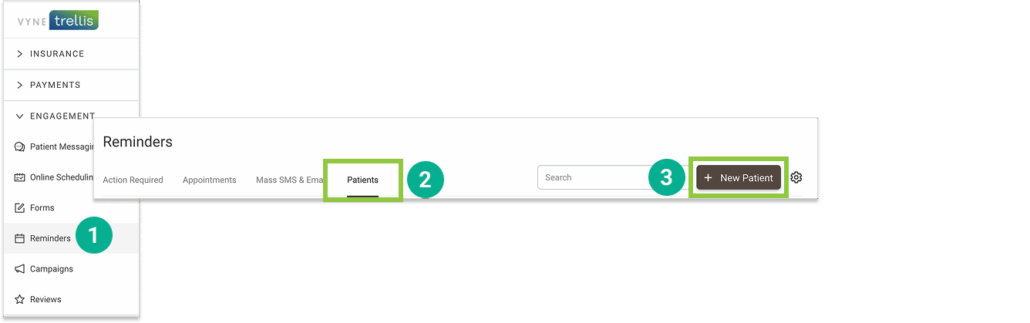
1. Open Trellis and expand the Engagement Section. Click on Reminders in the sidebar (this is where new patients can be added and shared with multiple engagement features)
2. Select the “Patients” tab
3. Select the “+ New Patient” button
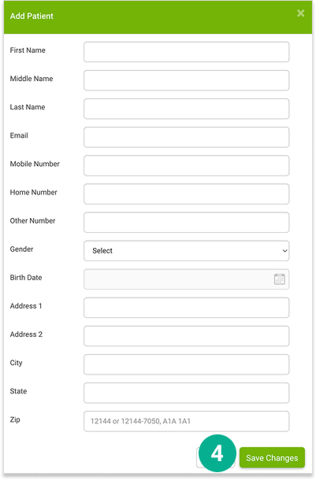
4. Complete the patient's information and select the "Save Changes" button
Step 3
Add the Reviews widget to your website
1. Open Trellis and expand the Engagement Section. Click on Reviews in the sidebar
2. Select the Settings “gear” icon in the upper right
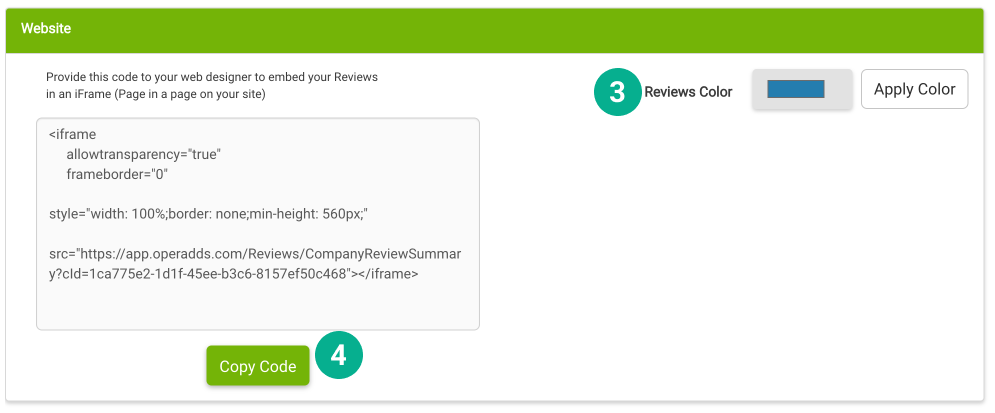
3. Under the Website section, adjust your Reviews Color to a color that matches your office's palate
4. Click Copy Code and provide this to your website designer to feature your Google and/or Facebook reviews!
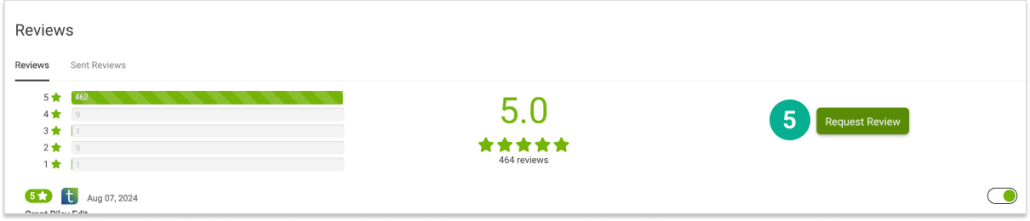
5. You can also manually send a request to a patient for a review by click on the Request Review button on the main Reviews page
Step 4
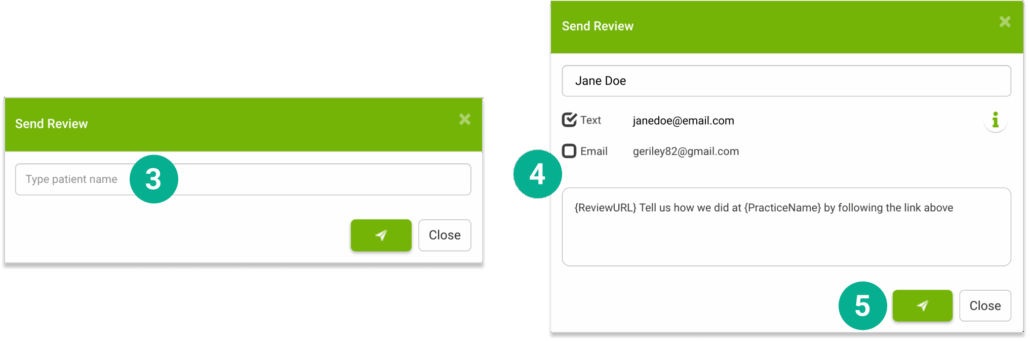
Send a Request for a Review
1. Click on “Reviews” in the sidebar
2. Select the “Request a Review” button

3. Start typing a patient’s name and select it from the list
4. Select whether you want to send the request by Text or Email
5. Click the Send button to send your Review request
Step 5
Monitor your score in your dashboard
1. Select Reviews

2. Your Reviews tab lets you see all completed reviews - and allows you to select which reviews you’d like visible on your website

3. Your Sent Reviews tab lets you see all request that have been sent to patients request a review

Step 1
Create your first message
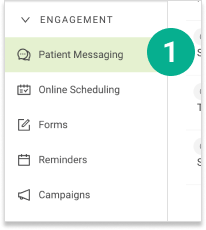
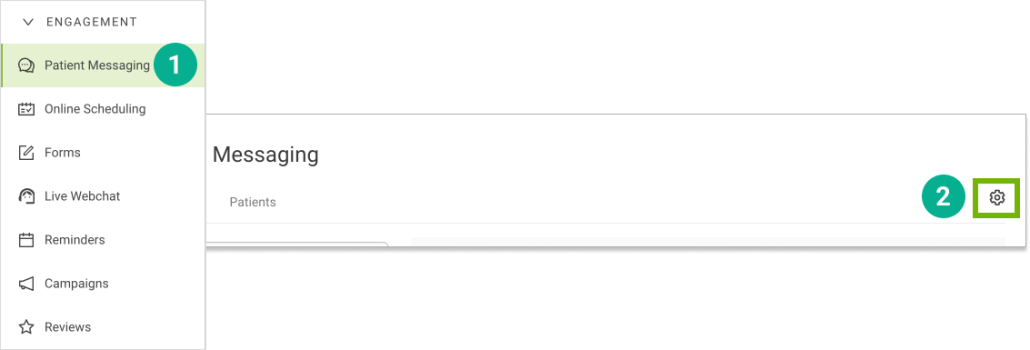
1. Open Vyne Trellis and expand the “Engagement” section. Select Patient Messaging
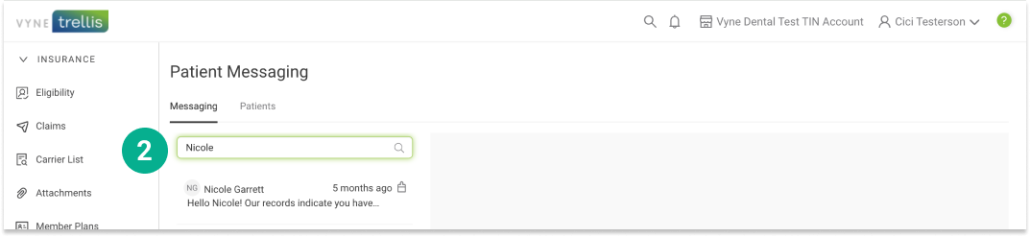
2. To start a message, enter the first or last name of the patient with whom you would like to message. A list of patients matching your entry should appear. Select the patient you would like to message. If you have previously messaged the selected patient, the chat history will appear
If a patient does not appear on your current list, you can easily add them:
3. Select the Patients tab
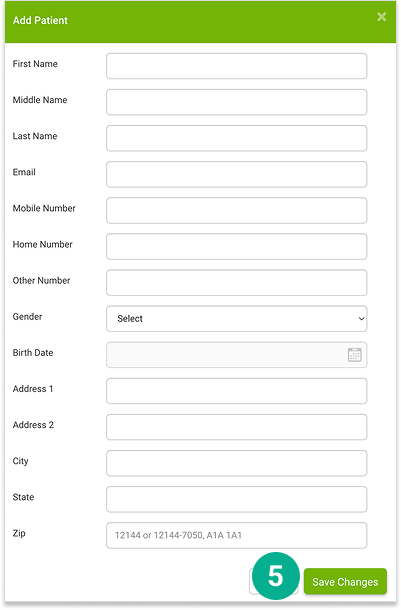
4. Select the "+ New Patient" button

5. Complete the patient’s information and select the “Save Changes” button. This patient will be added to your message list
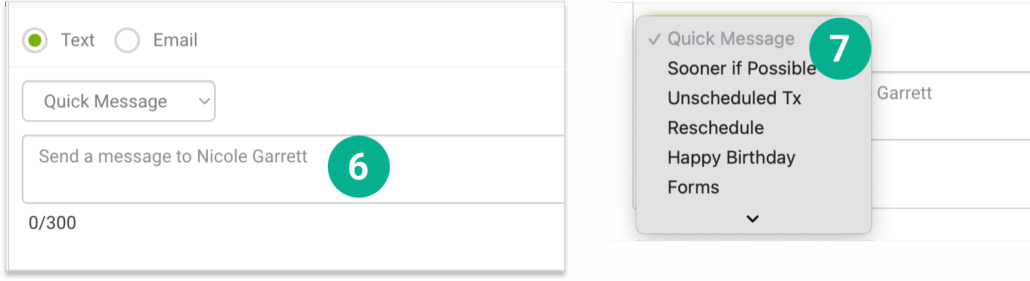
6. Enter the message you would like to send to the patient at the bottom of the screen, select to send by text or email, and click Send
7. You can also select and send any custom, pre-written responses you have prepared. Click on the “Quick Messages” dropdown to select any message
Step 2
Add your own customized Quick Messages
1. Open Trellis and expand the Engagement Section. Click on Patient Messaging in the sidebar
2. Select the Settings “gear” icon in the upper right
3. On the right, select the New Quick Message button for either SMS or Email
4. Once the New Quick Messages window opens enter a title, message (including any custom tags you want to include) and click save. This message will now be available when you are messaging your patients

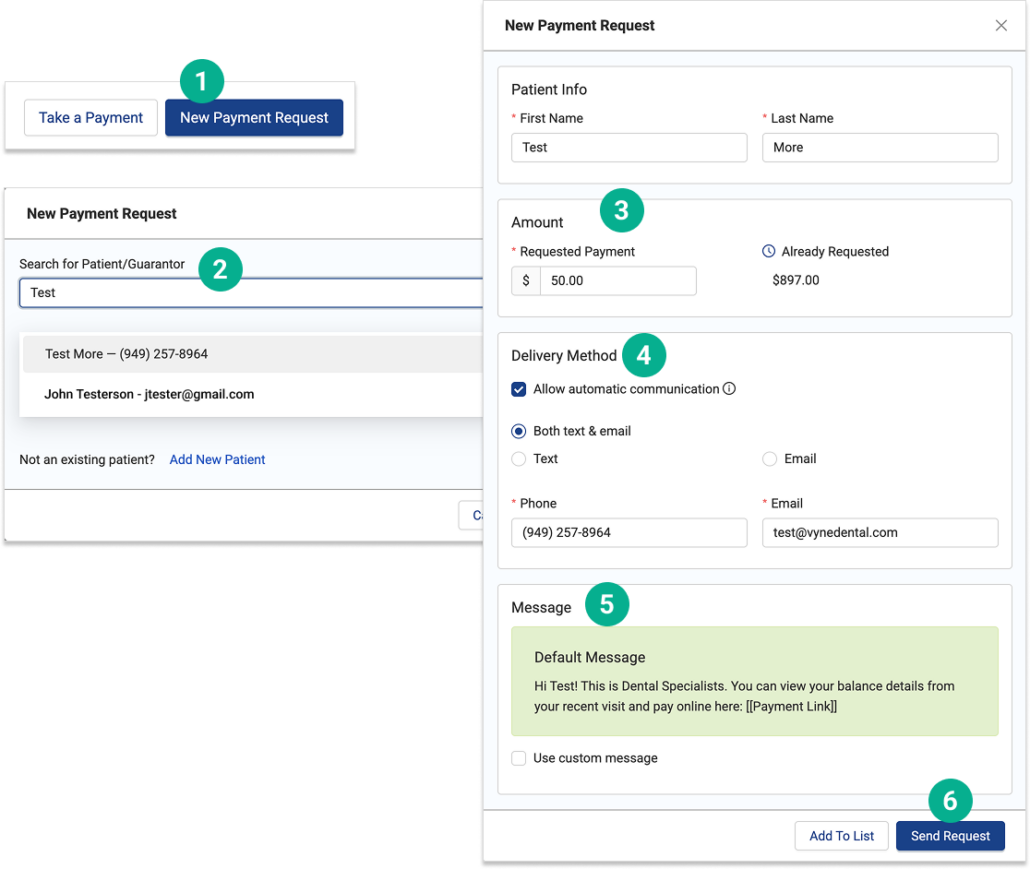
You can easily send a payment request to patients you have previously invoiced via Trellis - or add new patients as needed.
To send a payment request to a previously invoiced patient:
1. Click the “New Payment Request” button in the top right corner of the screen
2. Search and select the patient you would like to message
3. Adjust the amount you would like to request from the patient
4. Specify delivery method (text, email, or both)
5. Edit the wording of the message if needed
6. Click “Send Request” in the bottom right of the screen
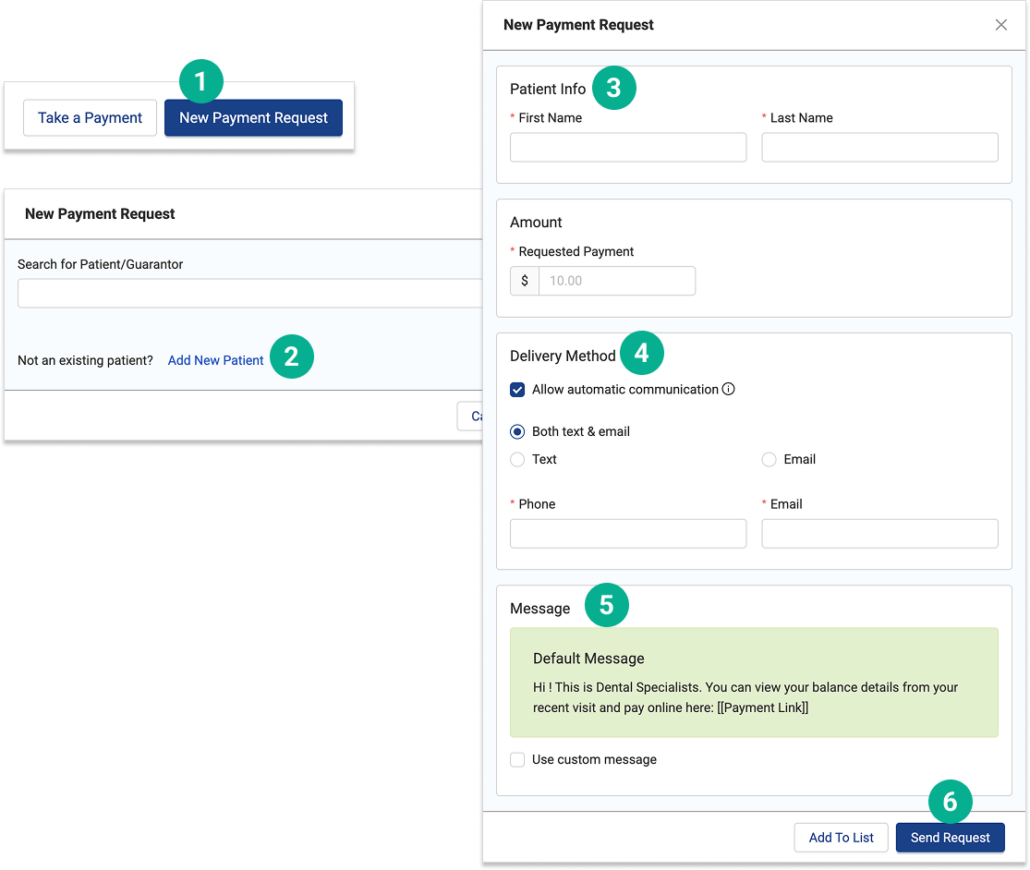
To send a payment request to a new patient:
1. Click the “New Payment Request” button in the top right corner of the screen
2. Click the “Add New Patient" link
3. Enter the patient’s name, amount you are requesting, and contact information
4. Specify delivery method (text, email, or both)
5. Edit the wording of the message if needed
6. Click “Send Request” in the bottom right of the screen
Related Article
Step 1
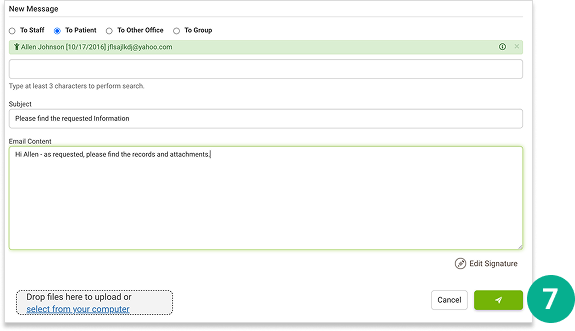
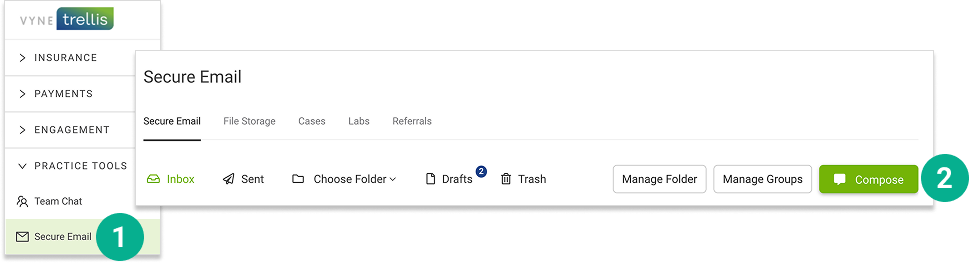
Send a Secure Email
1. Open Vyne Trellis and expand the “Practice Tools” section. Select Secure Email
2. Select the “Compose” button
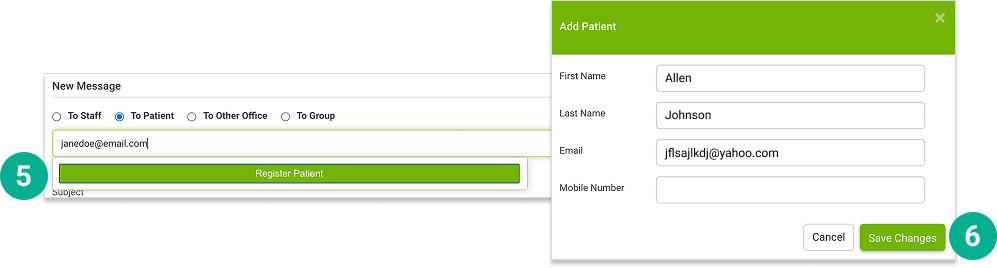
3. Select the recipient type (Staff, Patient, Other Office, Group)

4. Start typing the recipient’s email
If the recipient is an existing contact, select them from the results

5. If the recipient cannot be found by email select the Register Patient button
6. Complete the Add Patient Form and click Save Changes
7. Complete the subject line, email message, and any attachments and click the Send button to send your Secure Email