FastAttach® Release Notes & Quick Guide
Document Date: 2022-03-11
Release Summary
Introducing FastAttach Desktop’s Claim Sync. Leverage practice management claim capabilities alongside FastAttach to streamline the attachment workflow by seamlessly connecting claims and attachments for payor delivery and adjudication.
The FastAttach Claim Sync capability provides an alternative to the legacy FastAttach/Patterson desktop integration in Patterson desktop versions 18+, and introduces continued integration with Patterson desktop version 21.20+.
Enable the Integration
FastAttach’s Claim Sync capability has been tested to work on Patterson desktop versions 18 and higher. The integration’s availability is dependent on the following criteria:
- EagleSoft must be installed on the same workstation on which you will be using FastAttach.
- FastAttach must be able to connect to EagleSoft.
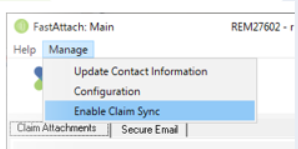
- For EagleSoft versions 21.20 or higher, Enable Claim Sync must be selected in FastAttach.
- From FastAttach Main screen click Manage | Enable Claim Sync.
Syncing Claim and Attachment Data
Once all integration criteria are met, you will see a Claim Sync button on the upper-right side of the FastAttach Main screen.

Once you are ready to begin the attachment process for your unsubmitted claims:
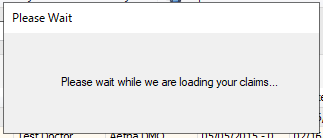
- Click Claim Sync. A loading prompt will briefly display, before launching the Claim Sync window.
- The Claim Sync window will list all unsubmitted electronic claims for which you are able to create attachments. An abbreviated version of the claim records from EagleSoft is displayed to ensure easy identification of claims within FastAttach.
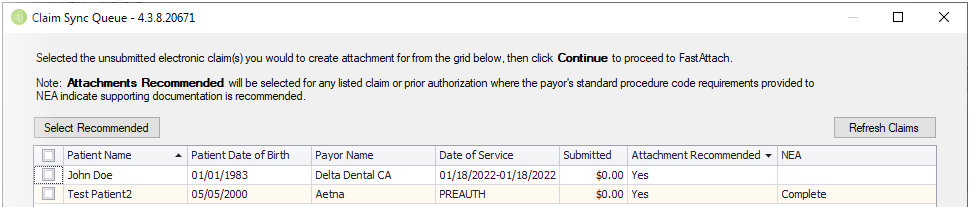
- Claims where an attachment is recommended based on FastLook requirements for the procedure codes present on the claim show Yes in the Attachments Recommended column. This is not a requirement and you may choose to ignore this prompt.
- The NEA column will remain blank until an attachment is generated and sent from FastAttach when initiated via Claim Sync, at which point it will populate to Complete, in the same manner as the Patterson desktop’s claims window
- To proceed with an attachment, select the claim(s) you wish to initiate an attachment for using the left-hand checkbox column, then click Continue.
Tip: Use the Select Recommended button to quickly select all claims where the Attachment Recommended column indicates Yes for import.
- The Claim Sync window will automatically close and the Claim Sync Confirmation screen will pop up, indicating a successful import of the selected claim(s)’ data for attachments. Click Close to be returned to the FastAttach Main screen.

Now the imported claims are accessible for attachments with a status of Needs Attention – Add Required.

Tip: If you determine an attachment is no longer needed, simply delete it from FastAttach. Tip: You may choose to send attachments from the FastAttach Main screen one by one, in batches, or all at once. Sending them together before returning to EagleSoft to process claims is not required. - Upon selecting Send for any Ready to Send attachments, you will see the Claim Sync Confirmation window which confirms that the NEA column now shows Complete.

- Click Close and you’ll now see the View Reports option with each submitted attachment receipt.
Tip: You may check Claim Sync at any time throughout the attachment workflow in order to confirm the NEA column is showing Complete.
Updating the Claim
Because the Claim Sync feature syncs continuously, claims are updated with NEA #s in real time, allowing you to return to Eaglesoft at any time throughout the attachment workflow.
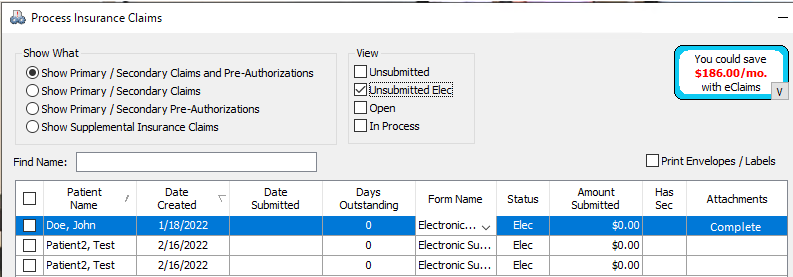
- Return to EagleSoft and open the Process Insurance Claims window.
- For ease and optimal visibility, select View > Unsubmitted Elec.
- All unsubmitted electronic claims that had attachments generated and sent via the FastAttach Claim Sync will now be displayed with the Attachment status Complete.
- Claims with an an Attachment status of Complete have the NEA# successfully appended to the claim, and are ready for processing.
Tip: You may need to close and reopen the Process Insurance Claims window to refresh the Attachments column status.
To verify that the NEA# successfully appended to the claim:
- Select a claim from the Process Insurance Claims window where the Attachment status is Complete.
- Select Change Answers from the right-hand button list to see the Modify Claim Answers window.
- Based on your EagleSoft version, the NEA# will populate in one of two locations:
- Prior to v21: To the right of the Remarks for Unusual Services > eAttach Number
- v21 or higher: In the Remarks for Unusual Services box, as NEA#

(c) 2022. Napa EA/MEDX, LLC. All rights reserved. All third-party trademarks and tradenames (including logos and icons) referenced are and remain the property of their respective owners.
The information provided herein is for informational and training purposes only. This information is not intended to be exhaustive, may be dated or need updating in the future and does not guarantee any specific outcomes. Vyne Dental is not liable and does not guarantee the quality and/or results relating to the functionality of third-party products or services.
Classified: Company Controlled
