Failure to submit your Legal Business Information will result in limited functionality of Vyne Trellis® features. Important: This step must be completed before training or onboarding can begin. This information is typically found on an EIN (CP575) or 147c Tax Form.
What happens if I don't update my Legal Business Information?
If you fail to include the required information, text messages will be marked as spam and blocked from reaching patients.
Connect Vyne Sync to Your Practice Management System*
By connecting Vyne Sync, patient appointment data will automatically flow into Vyne Trellis for automated appointment reminder and confirmation messaging. Note: Vyne Sync is required to be installed on your practice server.
*If you have not already connected Vyne Sync to your Practice Management System.
Map your confirmation statuses for automated clinical and hygiene appointment reminders. Enable powerful tools like insurance change reminders to keep your patient insurance records up-to-date with set-it-and-forget-it functionality.
Status Mapping – 2 mins
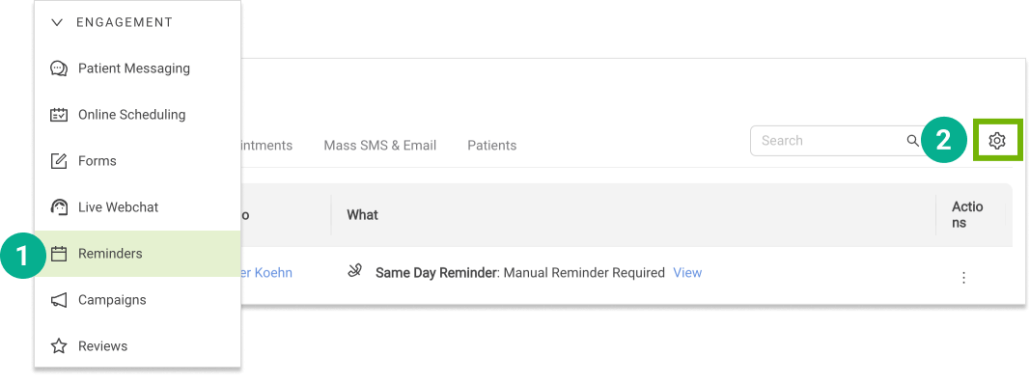
Reminders Settings 1. Open Trellis and expand the Engagement Section. Click on Forms in the sidebar. 2. Select the Settings “gear” icon in the upper right. 3. Choose PMS Sync to set “Status mapping from/to PMS”.
4. Select if you want to Exclude Operatories
5. Click on Settings to review and modify all General Settings
6. Insurance Change Reminders By enabling the ‘Insurance Changes’ setting, patients will be prompted to provide any updates to their insurance during the appointment reminder and confirmation process. This ensures your practice collects the most current insurance information efficiently.
7. Modify Appointment Reminder Notices and enable in the upper right of each notice type.
8. Modify Appointment Reminder Notices by using the gear icon to update your preferred schedule and delivery method.
9. After enabling your notice types, activate Reminders in the top right of the page.
10. Other Notice Types.
Birthday Reminders
Forms Reminders
STEP 4
Customize Your Hygiene Recall Experience
Map your hygiene Recall statuses to send due and past due recall reminders automatically. Empower patients with self-booking tools, allowing them to schedule their appointments directly from recall notices.
1. Map your Recall statuses to monitor your Practice Management System.
2. Add your Online Scheduling link.
3. Modify your Due Notices by using the gear icon to update your preferred schedule and delivery method.
4. Modify your Past-Due Notices by using the gear icon to update your preferred schedule and delivery method.
5. After enabling your notice types, activate Recall Reminders in the top right of the page.
STEP 5
Learn More About Appointment Reminders & Hygiene Recall