Open Vyne Trellis and expand the “Practice Tools” section.
1. Select Team Chat
STEP 2
Add Users to Team Chat
1. Open Trellis and Expand the Practice Tools Section. Click on Team Chat in the sidebar. 2. Select the Settings “gear” icon in the upper right.
3. Select “+ Add New User” and complete the required fields (4) and settings. Once complete, the user will now be available in Team Chat.
STEP 3
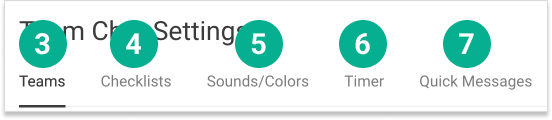
Modify your Team Chat Settings
1. Open Trellis and expand the Practice Tools Section. Click on Team Chat in the sidebar 2. Select the Settings “gear” icon in the upper right
3. Your Teams tab allows you to create and manage groups of team members in chats 4. Your Checklists tab allows you to create and manage custom checklists that can be shared among Teams. 5. Your Sounds/Colors tab allows you to update Sound Notification/Display Color for Team Members 6. Your Timer tab 7. Your Quick Messages tab allows you to create and manage pre-filled messages to send to your Team members.
STEP 4
Download the Team Chat PC Notifier
1. In the top right, click on your Profile name, then Downloads.
2. Scroll down to the Team Chat PC Notifier and click Download. The plugin will allow you to receive notifications from your PC, even if your browser is closed or minimized. Just click on the notification to open and view your Chat messages.
Note: Windows 8 users will receive a warning that it is from an unknown publisher. You will need to select to keep and run the application.
STEP 5
Send your first message
1. Click on the individual user(s) or if sending to an entire group you can select the team from the team section in a one-click motion. 2. Enter the Message you would like to include. 3. Click Send.